How To Remove Border Line From Table In Word
Click in any cell to show the table move handle in the upper left corner of the table. Click the table move handle to select the table and show the Table Design tab.
How To Remove Table Lines From A Microsoft Word Document Microsoft Office Tips Youtube
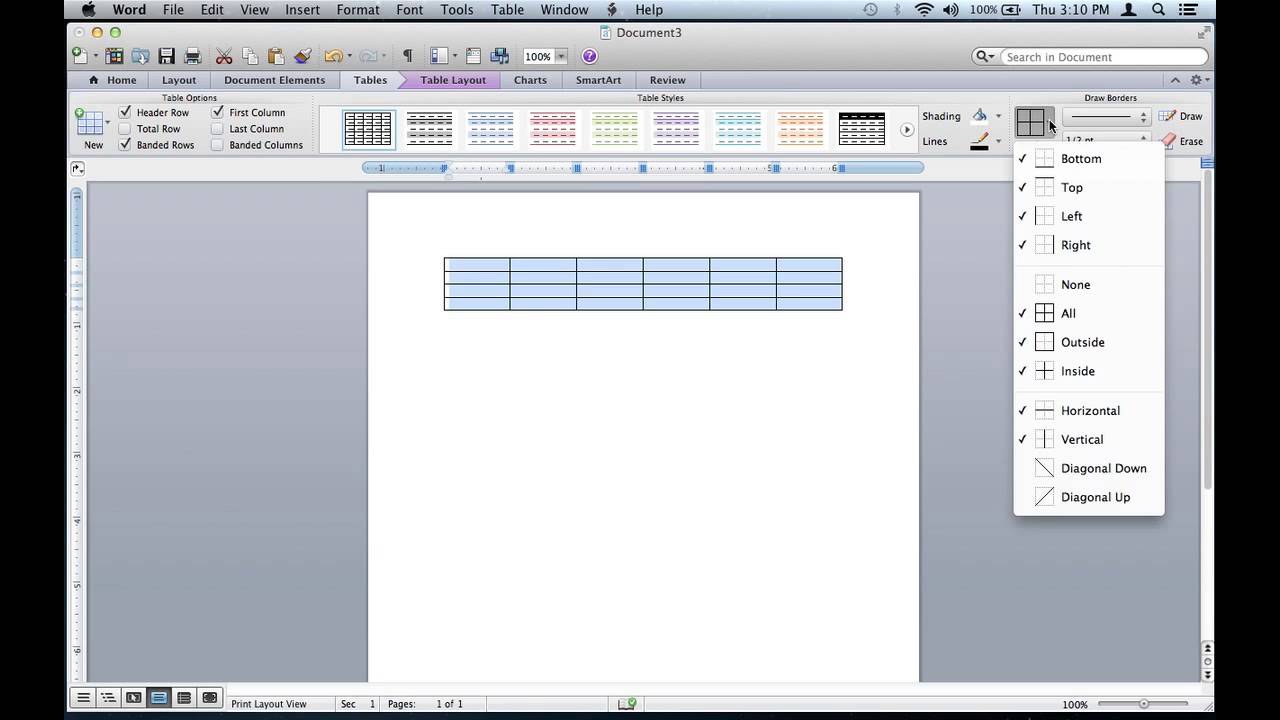
Click to the Design tab and click the down arrow to the right of the Borders button in the Table Styles group.

How to remove border line from table in word. Table tab Options you will see white space along the sides with margins. To turn off the gridlines for the table simply select the table and click View Gridlines again. Be sure to click Borders not Border Styles.
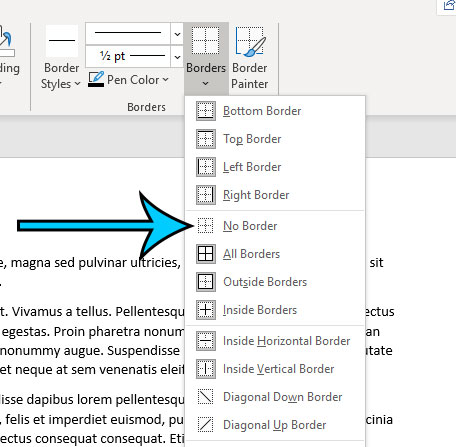
On the Table Design tab click the arrow next to Borders and then click No Border. To remove all the borders from the table click Borders and select No Border from the drop-down menu. Select any table cell.
Clicking the main button area simply removes or adds the last border element used by this button. You should note that when you erase a line that is a common border between two cells the two cells are merged. On the Table Design tab click the arrow next to Borders and then click No Border.
Since you are late-binding you could add the following lines. Select the row of the table that contains the cell and then hold down the SHIFT and ALT keys while you drag the cell markers on the ruler to the required positions. Click in any cell to show the table move handle in the upper left corner of the table.
In this video MS Office Tutorial- How to Remove Table Border Line in Microsoft Word 2017. In the Table Properties window that appears click the Row. After you insert the table the insertion point is typically within a cell of the table.
When you add a text box in a Word document it appears with a border around it. From the Format menu click Text Box. There are many different ways to get rid of the borders but perhaps the simplest is to simply press CtrlAltU right after inserting the table.
To turn them off select the table and then press Ctrl AltU. Make sure you click the down arrow and not the body of the button. Remove only some.
This will result in white space above andor below the text. The border lines appear around the edge of the table. In addition if you have applied cell margins Table Table Properties.
First off the property that controls table border lines is the Borders option at the top Ribbon of Word. Close the Tables and Borders toolbar when finished. On the ribbon go to Home Paragraph and click the arrow-down button on the Borders button.
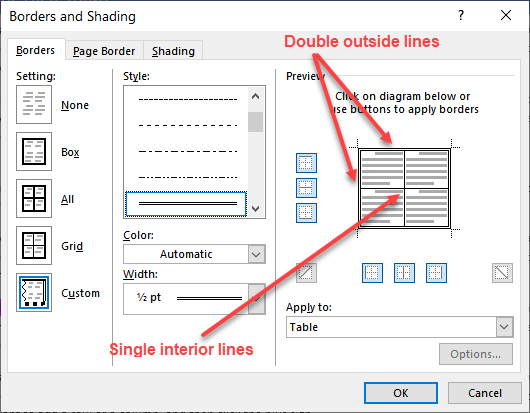
If you want to remove the border you must change the formatting of the text box. Or right-click the border choose Borders And Shading from the context menu and then click None in the Settings section on the. Drag the mouse to select the numbers of horizontal and vertical rows.
Then select your preferred. Then select your preferred border line. XlEdgeLeft and xlLineStyleNone are from the Excel Object Model not from the Word Object Model and you need the latter.
Just simply follow the steps below. In this tutorial I will show you how you can delete the border lines of a table in Micros. In the Table section of the Layout tab click View Gridlines.
To remove the border around a text box in Word 2002. In this tutorial I. Thats actually quite easy.
As you move your mouse over the options in the Borders drop-down menu the results of each choice are displayed on the selected table so you can see what the selected borders will look like. Remove Lines Around Text Box Word 2010. Youll see this option under the Table Design tab when you highlight a table but its always on the Home tab as well.
Is not the problem. Unless you configure Word to do so they will not normally appear when you print the document See the attached screen shots for illustrations. Const wdBorderLeft As Long -2 Const wdLineStyleNone As Long 0.
Go to the Insert Menu and Click the Table and Border. First go to Insert tab and click the drop down arrow of Table button. Word displays the last border element used on the button itself so thats helpful.
The View Gridlines option either shows or hides the gridlines for ALL tables in your document. On the ribbon go to Home Paragraph and click the arrow-down button on the Borders button. Click and drag to select the table lines you want to erase.
You can toggle them off or on from View Gridlines tab under Table Tools in the ribbon. The gridlines now display on the table. Click the Layout tab that appears at the top and then click on Properties on the far left.
First off the property that controls table border lines is the Borders option at the top Ribbon of Word. Youll see this option under the Table Design tab when you highlight a table but its always on the Home tab as well. Click the table move handle to select the table and show the Table Design tab.
And replace xlEdgeLeft and xlLineStyleNone with these respectively. When the table is completed go to Design tab and click the drop down arrow of Borders. Click within the text box.
Remove border lines from table in Word. If you have applied space above andor below the text in Format Paragraph. Click on the Eraser tool again on the toolbar or press the Esc key.
This turns off the Eraser tool.

How To Hide Table Gridlines In Word 2010 Solve Your Tech
How To Remove A Border From A Word Document Remove Border Line Word 2016 Youtube
Last Row Border Formatting Microsoft Word

How To Remove Table Borders In Microsoft Word For Office 365 Masteryourtech Com

How To Remove Borders From A Table In Microsoft Word For Office 365 Support Your Tech
How To Remove Borders From A Table In Microsoft Word For Office 365 Support Your Tech
How To Remove Table Borders In Microsoft Word For Office 365 Masteryourtech Com

How To Remove Table Borders In Word 2010 Solve Your Tech

How To Remove Automatic Horizontal Lines In Word
Post a Comment for "How To Remove Border Line From Table In Word"